


About diver's bailout system design
As with many diving procedures and systems, the diver's
emergency gas supply design is a very old debate that started at the
same time it was decided to provide bailout bottles and when the 1st
models of full face masks and helmets equipped with a side supply
block appeared on the market (see below).
These debates should not exist, as there is, in fact, no reason for
that if the principles of risk assessment are correctly used.
Thus, for every problem, we have solutions, some of which are more
suitable in a given situation and less in another. To identify the most
appropriate procedure and equipment, we need to:
•
Not thinking according to dogmas.
•
Not reacting when we are under emotion (emotion is often after
an undesirable event).
•
Use history and reporting of events to clarify the problem
discussed.
•
Provide advice or take a decision only when we are adequately
documented.
•
Banish propaganda and associated fallacies.
•
keep a distance from problems to analyze them with a clear
mind.
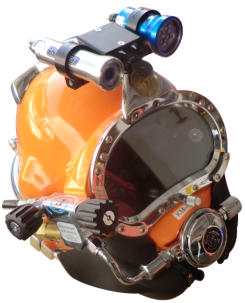
Even though helmets equipped with a side supply block are today the
norm adopted by most manufacturers (compliance to EN 15333
standards), a few models still in service are not provided with such
a system. In this case, the side block can be replaced by a manifold
block attached to the bailout's harness. Nevertheless, it may happen
that the manifold block is not provided. In this case, the bailout bottle
is inverted (valve and regulator at the bottom side), so the diver can
easily access the cylinder's valve to open and close it. This type of
arrangement was recommended by many helmet manufacturers,
such as in the technical manual of the Aqua Lung Gorki G2000 SS
(see the image below from this manual).
Note: The Aqua Lung Gorki G2000 SS is replaced with the G3000 SS.
Some people argue that the 1st stage regulator of a bailout closed on
the bottle with no valve provided on the hat can be invaded by water
and damaged. It is not false if the helmet is flooded. However, this
problem can be easily solved by installing a non-return valve similar
to the one used for the surface gas inlet.
Another reason for closing the bailout bottle is linked to the fact that
divers involved in civil works are often working in areas where there
is absolutely no visibility, even using a light (so they are totally in the
black), and where many sharp objects that can wound them and
damage their equipment are present. For example, my first
commercial dive was performed under such conditions to install a
cofferdam in an enclosed canalization, and I was impaled on a
sharpened concrete bar no one was informed of.
In such working conditions, it is impossible to read a gauge, so the
diver does not know whether his bailout is still filled or is empty due
to a micro link he cannot detect. This is why people involved in such
missions often prefer closing the bottle's valve that must be opened
to activate the bailout. As a result, the cylinder must also be inversed
to allow easy access to the bottle's valve.
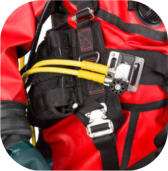
The method commonly used with helmets equipped with a side block
and further explained next is to close the two valves. Some say that
in this case, activating the bailout requires two manoeuvers.
Nevertheless, we can consider that some bailout rebreathers used in
saturation, such as the DIVEX MK4, also need two maneuvers to be
activated, which can be very quickly done.
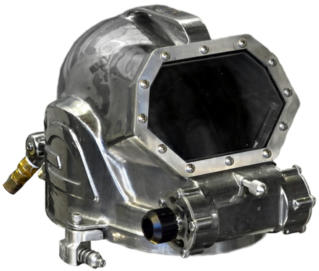
Another reason for inversing the bottle is that when operating in
such an enclosed space, there is also a risk of damaging the
regulator and hoses due to repeated shocks with unseen objects
above the diver and sometimes the ceiling. As an example. the photo
below shows a continuous flow helmet designed for operations in
such conditions by “Composite Beat Engel” ( https://composite-
be.com/ ). In addition to the inversed gas cylinders, note the
particular arrangement of the valve handles to prevent them from
being caught and damaged by obstacles, and also the removable
protector. This design allows activating the bailout from a suitably
protected side block.
Note that firefighters arrange their breathing apparatus in the same
manner for similar reasons.
Based on the above, we can compare a few arrangements’
advantages and inconveniences and use these elements for a risk
assessment:
1.
Bailout bottle with the valve at the upper position and connected
to a helmet with a side block:
It is the most adopted solution and my preferred when it can be
implemented. The bottle's valve is open, and the valve of the
helmet is closed.
Advantages:
The valve is immediately and easily accessible (easy to find
and operate).
Only one hose (from the regulator to the block) which is
limiting the risk of leaks
The standby diver can wear the bailout while sitting on his
chair without the risk of damaging the regulator and
connections.
The supply hoses are those of classical SCUBA regulators
(easy to find)
Easily accessible for inspection during the check list (the lead
diver does not need to bend).
Inconveniences:
More vulnerable in enclosed spaces and areas where sharp
objects, cables, ropes, etc., are present above the diver.
A solution applied by some teams to protect the regulator is to
add a protection frame. However that has often the
inconvenience to limit the access to the valve and the
regulator.
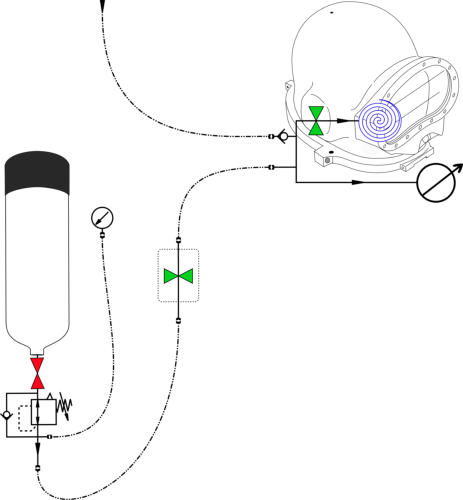
2.
Bailout bottle with the valve at the lower position and connected
to a helmet with a side block:
This solution can be used by those who need to operate in
enclosed spaces and areas where sharp objects, cables, ropes,
etc., are present. The bottle's valve is open, and the valve of the
helmet is closed. Thus, no change except that the bottle is
inverted.
Advantages:
The valve is immediately and easily accessible (easy to find
and operate).
Only one hose (from the regulator to the block) which is
limiting the risk of leaks
The bottle’s valve and the regulator are not exposed to
repeated shocks with unseen objects above the diver and
sometimes the ceiling.
Inconveniences:
The long hose must be secured (usually along the backpack),
and the technician must ensure that there are no excess
lengths.
There is a risk of damaging the regulator and connections
while the standby diver is sitting on his chair (Remember that
the standby diver must be ready to go, so dressed), which
obliges fabricating a specific chair. Still, even with such
arrangements, it happens that the regulator has shocks
resulting from lousy handling.
The regulator and the valve are protected from repeated
shocks with unseen objects above the diver, but not from
repeated contacts with objects at their level.
Less easily accessible for inspection during the checklist than
a valve at the upper position (the lead diver needs to bend).
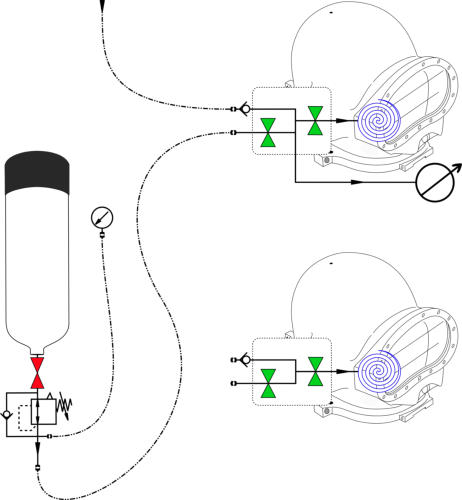
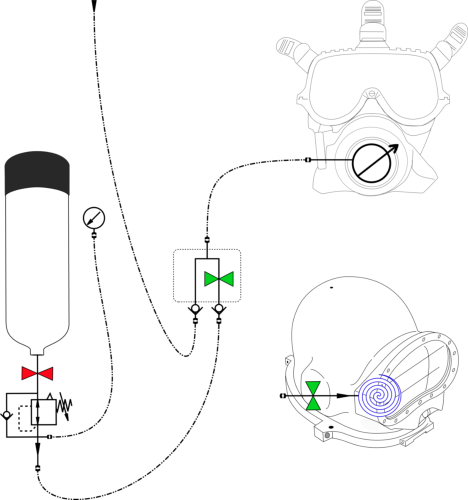
3.
Bailout bottle with the valve at the lower position and connected
to a separate manifold installed on the diver’s harness:
This system is implemented with helmets not provided with a
bailout valve, such as the Aqua Lung G2000SS, taken as a
reference for the scheme above. The bottle's valve is usually
open, and the valve of the manifold is closed.
Note that the other possibility to connect a bailout with these
types of helmets is a direct connection from the bottle (See in
point #5). Also, some old helmet models can be retrofitted with a
side block.
Advantages:
The bottle’s valve and the regulator are not exposed to
repeated shocks with unseen objects above the diver and
sometimes the ceiling.
Inconveniences:
Two hoses, so more connections (1 from the HP regulator to
the manifold & 1 from the manifold to the helmet). More
connections = more possible leaks.
The hose from the HP regulator must be secured (usually
along the backpack and the harness), and the technician
must ensure that there are not lengths in excess.
There is a risk of damaging the regulator and connections
while the standby diver is sitting on his chair (Remember that
the standby diver must be ready to go, so dressed), which
obliges fabricating a specific chair. Still, even with such
arrangements, it happens that the regulator has shocks
resulting from lousy handling.
The regulator and the valve are protected from repeated
shocks with unseen objects above the diver, but not from
repeated contacts with objects at their level.
The manifold valve is less accessible than a valve on a side
block (This is my advice based on my experience): Sometimes
the harness of the backpack moves, and the divers may not
find the manifold immediately.
The bottle’s valve and the HP regulator are less easily
accessible for inspection during the checklist than a valve at
the upper position (the lead diver needs to bend).
4.
Bailout bottle with the valve at the lower position that is closed,
and connected to a separate manifold installed on the diver's
harness or the side block of the helmet:
The bottle's valve is closed, and the valve of the manifold or the
side block of the helmet is also closed.
This method should be used only when the diver operates in a
surrounding where the equipment can be damaged, and there is
absolutely no visibility (Black), so no possibility of verifying
whether the bailout is still filled or is empty as a result of an
undetectable leak. It should not be used under normal conditions.
Also, note that closing the cylinder valve of the bailout and letting
the valve of the side block in open position to be able to activate
the bailout quicker is not a good idea: In case of a shock to the
opened valve, its stem, usually made of brass, will be easily bent,
resulting in the valve that cannot be closed, and often a leak due
to the deformation of the stem near the O-ring.
Advantages:
The bottle’s valve and the regulator are not exposed to
repeated shocks with unseen objects above the diver and
sometimes the ceiling.
Possibilities of leakages from the bottle are limited only to
those of the O-ring of the pillar valve.
Inconveniences:
In case a manifold is used: Two hoses, so more connections
(1 from the HP regulator to the manifold & 1 from the
manifold to the helmet). More connections = more possible
leaks. The hose from the HP regulator must be secured
(usually along the backpack and the harness), and the
technician must ensure that there are not lengths in excess.
In case a direct connection to a side block is used: The long
hose must be secured (usually along the backpack), and the
technician must ensure that there are no excess lengths.
There is a risk of damaging the regulator and connections
while the standby diver is sitting on his chair (Remember that
the standby diver must be ready to go, so dressed), which
obliges fabricating a specific chair. Still, even with such
arrangements, it happens that the regulator has shocks
resulting from lousy handling.
The regulator and the valve are protected from repeated
contacts with unseen objects above the diver, but not from
repeated contacts with objects at their level.
When there are two valves (bottle & manifold or side block),
activating the bailout requires opening the bottle valve 1st and
then the manifold or side block valve not to flood the
regulator. Installing a non-return valve at the helmet inlet is
“recommended” to avoid this problem.
The bottle’s valve and the HP regulator are less easily
accessible for inspection during the checklist than a valve at
the upper position (the lead diver needs to bend).
Depending on the size of the cylinder and the position of the
diver, the valve of the bottle is not as easily accessed as the
valve on the side block.
When used, the manifold valve is less accessible than a valve
on a side block.
5.
Bailout bottle with the valve at the lower position and the hose
from the regulator directly connected to the helmet without
intermediate manifold or side block:
This system is provided with helmets with no side block, such as
the Aqua Lung G2000SS. The bottle's valve is closed, as there is
no intermediate valve.
The other possibility to connect a bailout with these types of
helmets is indicated in point #4. As said previously, some helmet
models can be retrofitted with a side block.
Advantages:
The bottle’s valve and the regulator are not exposed to
repeated shocks with unseen objects above the diver and
sometimes the ceiling.
Possibilities of leakages from the bottle are limited only to
those of the O-ring of the pillar valve.
Inconveniences:
The hose from the HP regulator must be secured (usually
along the backpack and the harness), and the technician
must ensure that there are not lengths in excess.
There is a risk of damaging the regulator and connections
while the standby diver is sitting on his chair (Remember that
the standby diver must be ready to go, so dressed), which
obliges fabricating a specific chair. Still, even with such
arrangements, it happens that the regulator has shocks
resulting from lousy handling.
The regulator and the valve are protected from repeated
contacts with unseen objects above the diver, but not from
repeated contacts with objects at their level.
The bottle’s valve and the HP regulator are less easily
accessible for inspection during the checklist than a valve at
the upper position (the lead diver needs to bend).
Depending on the size of the cylinder and the position of the
diver, the valve of the bottle is not as easily accessed as the
valve on the side block.
Based on the evaluations above, a hazard identification can be
undertaken that should be used for the risk assessment previously
mentioned. However, these points will be insufficient alone, and the
team should also consider:
•
The type of helmet, bailout bottles, harness, and, if used,
Buoyancy Control Device (BCD) available.
•
Whether the existing equipment can be retrofitted to a more
recent standard.
•
The configuration of the place where the operation is planned,
and whether previous ROV inspections or diving operations
have been carried out.
•
The technical level and experience of the divers.
•
Whether equipment such as a diver-held sonar system is
available for diving operations in the total black.
Of course, selecting a particular bailout arrangement for a dive or
operations in a specific area does not mean that this arrangement is
to be used everywhere, so considered the only procedure in the
company policy. For example, it is suitable to apply the first
arrangement (Bailout bottle with the valve at the upper position and
connected to a helmet with a side block) for every common operation
and select exceptionally another one for a particular operation. What
is important for organizing operations is to think of what will be the
best for the divers, and as previously said, not acting according to
dogmas, emotion, improperly reported events, propaganda, etc.
Bailout valve
Bailout inlet
Free-flow valve
Surface gas inlet
(with non retun valve)
2nd stage regulator
Regulator adjusting


The surface gas and bailout
inlets are arranged in the back

Free-flow valve

There is no bailout valve
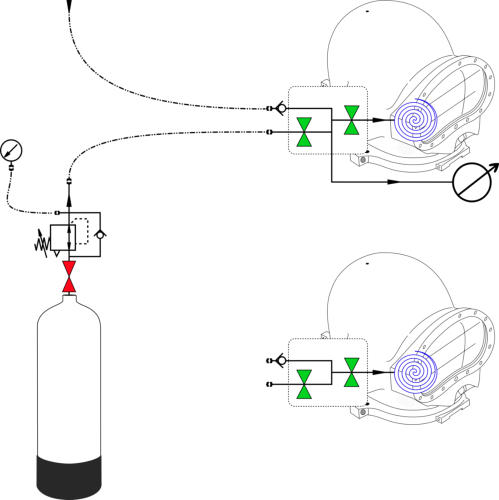

HP to LP regulator
Flexible hose (HP or LP)
Demand valve
Pressure gauge
Free flow
Low Pressure valve
Non return valve
High Pressure valve
Legends


Continuous flow hemet
Demand valve helmet
Side block

Side block


Demand valve helmet
Side block


Continuous flow hemet
Demand valve helmet
(Gorki G2000ss type)


Manifold

Manifold
Demand valve without side block


Demand valve helmet
(Gorki G2000ss type)
Continuous flow helmet
Continuous flow without side block


Demand valve with side block

Continuous flow with side block


Click on the
octopus to return to
the top of the page